

microfluidic dish PimCell® Tube


Microfluidic dish PimCell® Tube is suitable for perfused 3D tubular cell culture, assembloids, barrier integrity and transport, angiogenesis, BBB, gradient formation and cell migration.
Details
Ref. number: 231-1212-22
Price: €480,00 per one Dish
Size: 35x10 mm
Aperture: 22 mm
Material: Black polystyrene surrounds & lids with transparent PDMS Dow Sylgard™ 184 Silicone microfluidic part
Bottom: #1.5 borosilicate glass D-263® M
Not sterilized
All our products are "FOR RESEARCH ONLY!"
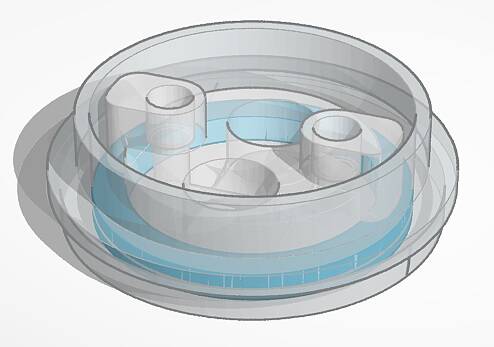
PimCell® Tube Dish is an easy-to-use microfluidic dish specifically developed to handle the requirements of larger tissues connected to a cellular tube in experiments and assays (e.g. BBB). Each microfluidic PimCell® Tube Dish contains a microfluidic part with two open top chamber (OTC) connected to one enclosed perfusion channel without any physical barrier between. The OTC can be used as an organoid compartment like a brain organoid.

- Perfusion channel inlet
- Perfusion channel outlet
- Open top chambers

Schematic representation of a microfluidic PimCell® Tube Dish
Microfluidic PimCell® Dishes need end user sterilization. Please see our ''Tech Specs'' for sterilization procedure
Concept of 3D cell culture using microfluidic PimCell® Tube Dish
The direct advantage of a microfluidic PimCell® Tube Dish is a 3D cell culture of relative large structures like a tissue slice without any dead volume always presented inside either inlets or outlets of (hydro)gel filled microfluidic channels. Using OTC design every desired 3D cell culture support can be directly introduced into the OTC chamber for gelation (i.e. gel or gel mixture with desired cells). The polymerized gel separates content of perfusion channels from the space above the cell culture chamber allowing seeding different cell types on the different part of a common 3D cell culture support. The direct benefit is an opportunity to create a novel or to modify existing in vitro 3D models for producing more valuable and reliable data. This protocol covers the basic usage of the microfluidic PimCell® Tube Dish such as OTC loading with a 3D cell culture support like gel, hydrating microfluidic perfusion channels and seeding monolayer cells on the media channel. Staining etc. are beyond of the scope of this general illustration but could be easily adapted from different publications.
Protocol
Device Preparation
1.1 Transfer the Petri dish with a sterile microfluidic PimCell® Tube Dish to a sterile biosafety cabinet
1.2 Open the Petri dish and load 500 µL of deionized water or phosphate-buffered saline (PBS) between the wall of the microfluidic PimCell® Tube Dish and its microfluidic part using a pipette. Leave the microfluidic dish with the lid on in the sterile cabinet at room temperature (RT) for 1 hour
Water could reduce evaporation during gel polymerization
Prepare Gel and Coating
2.1 Prepare desired for your cell culture coating solution and place the solution in the water bath at 37°C till use
2.2 Prepare the required amount of desired gel mixture. The microfluidic PimCell® Tube Dish has two OTPs. Each chamber has 80 µL volume and needs at least 40 µL gel mixture per one OTC to be able to prevent leaking from a perfusion channel into the chamber

OTC volume of a microfluidic PimCell® Tube Dish is 80 µL
Keep the unpolymerized gel on ice and use gel immediately within 10 minutes after preparation
2.3 Place your pipette tip slightly above the bottom coverslip and gently dispense the gel mixture into the OTC of the microfluidic PimCell® Tube Dish
NOTE: Correct positioning of the pipette tip with gel mixture above the OTC allows capillary forces to pull the gel mixture under a capillary pressure barrier (CPB) along the adjusted perfusion channel without the gel overflows into the perfusion channel. Gel loading can be confirmed under a brightfield microscope by observing the meniscus formation. Microfluidic PimCell® Dishes with unpolymerized gel must be handled with care. Excessive agitation or impact cause unpolymerized gel to leak out into the perfusion channel and at least partly close this

OTC loading with a 3D cell culture support
2.4 Cover the PimCell® Tube Dish with its lid and place in an incubator (37 °C, 5% CO2) for 10 min to polymerize gel
NOTE: Due to the low volumes used in microfluidics the timing of the polymerization is crucial. Evaporation can be observed after 15 min of incubation resulting in gel collapse or shrinkage
2.5 Take the microfluidic PimCell® Tube Dish out of the incubator ant transfer to a sterile biosafety cabinet. Open the lid of the dish and gently dispense 100 µL of desired cell culture medium to each OTC above the polymerized gel
2.6 Gently add 45 µL of coating solution to the inlet of the perfusion channel. Place the pipette tip in the middle and slightly above of the inlet of the perfusion channel in order to allow the coating solution to enter the perfusion channel without trapping air bubbles. The perfusion channel should fill and the liquid should pin on the outlet without filling the outlet space

Loading coating solution

Coating solution pinning on the outlet without filling the outlet space
2.7 Incubate the coating according to common practice in literature
- Incubate PimCell® Tube Dish at 37°C in a humidified incubator or at RT, depending on coating of choice
- Incubate as short as 15 min or as long as 48h, depending on the coating of choice
Optional: if the coating of choice generally requires a washing step washing can be achieved by aspirating the coating solution and adding washing reagent (e.g. 35 µL water or PBS) to inlet and outlet spaces. Repeat if necessary
Microfluidic media channel cell seeding
3.1 Prepare desired endothelial or epithelial cell suspension
3.2 Transfer the microfluidic PimCell® Tube Dish from the incubator to a sterile biosafety cabinet
3.3 Carefully aspirate 35 µL coating solution from the inlet of the perfusion channel
NOTE: Do not aspirate coating solution from the perfusion channel to avoid closing the microfluidic system with an air bubble
3.4 Load 35 µL of cell suspension to the outlet of the perfusion channel. Place the pipette tip in the middle and slightly above of the outlet of the perfusion channel in order to allow the cell suspension to enter the media channel without trapping air bubbles. Visual inspection of the perfusion channel under a microscope is recommended
NOTE: Lay the PimCell® Tube Dish on a flat surface while seeding cells into the microfluidic dish. Inclination of the dish affects the flow in the perfusion channel disturbing cell distribution
3.5 Close the PimCell® Tube Dish with its lid and place static in the humidified incubator at 37 °C and 5% CO2 to allow cells to attach. The time cells need to attach is cell type dependent and generally varies between 0.5 – 3 hours
3.6 After cells have attached, add 50 µL of medium to the inlet of the perfusion channel.
3.7 Close the lid of the PimCell® Tube Dish and place the dish in the a humidified incubator at 37 °C and 5% CO2.
3.8 Refresh medium every 2–3 days on each OTC, inlet and outlet.
NOTE: Then you need more volume of cell culture media (i.e. for differentiation of iPSCs or organoids ) you can remove water or the PBS from the space around microfluidic part of the PimCell® Tube Dish and add more medium to the dish (e.g. 1,9 mL).

In this way you can modify different protocols for either static or dynamic 3D cell culture.